> ## Documentation Index
> Fetch the complete documentation index at: https://docs.researchanddesire.com/llms.txt
> Use this file to discover all available pages before exploring further.
# Design Guidelines for Contributions
> Standards and conventions for contributing printed part designs to the OSSM project
This page is a work in progress.
**TODO:**
* 3030 Extrusion Stand Assembly
* Add "OSSM - Mod" multiple-component project template
* Determine if Hardware components should be "independent" (for now, designer's preference—independent could allow a scripted hardware count)
Follow these guidelines when contributing user-designed projects to ensure easy incorporation into an official OSSM release.
 ## Project template
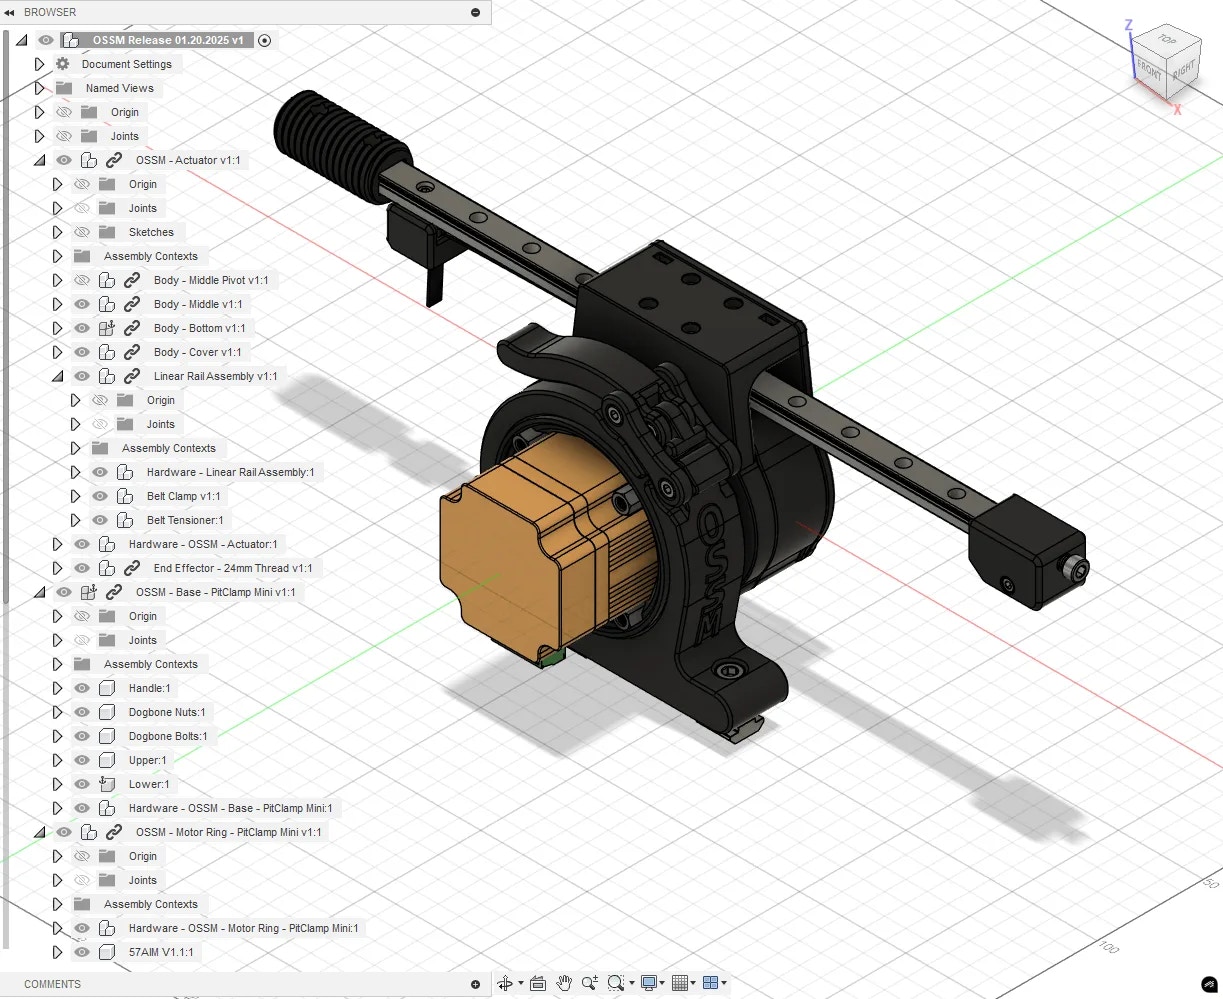
Use the contribution template located in the Templates directory (in the source repository) as your starting point. Replace "Project Name" in the Document and Component with your actual project name.
## Fusion file structure
Organize your Fusion 360 project following this hierarchy:
```
ProjectName
(Bodies)
(Component)ComponentNameOne
(Bodies)
...
(Component)ComponentNameTwo
(Bodies)
...
(Component)Hardware - ProjectName
(Bodies)
(Component)HardwareName:1
(Bodies)
...
(Component)HardwareName:2
(Bodies)
...
```
## Naming conventions
### Reserved characters
These characters have special behavior in documentation scripting. Follow these rules when naming Documents or Components.
| Character | Purpose | Usage rules |
| ------------------ | ---------------------------------------------- | ------------------------------------------- |
| `.` (dot) | Designates file extension | Allowed for versioning, e.g., `V1.1` |
| `-` (hyphen) | Designates parent-child Component relationship | Allowed in hardware names, e.g., `M5 T-Nut` |
| `_` (underscore) | Designates a Component | **Disallowed** |
| `[]` (brackets) | Designates reuse of hardware | Special use only |
| `()` (parentheses) | Designates special hardware instructions | Special use only |
### Single component projects
If your project contains only one printable Component, name that Component identically to the ProjectName.
### Parent-child component relationships
To designate a part as a child of a Parent Component, use the Parent Component's exact name followed by `-` and the Child Component name.
Example: `End Effector - 24mm Short` places the release file in the "End Effector" directory, named "24mm Short".
Only one Parent-child relationship is allowed per Document, and it must be on a single level. For more complex relationships, nest Documents as linked Components.
### Version increments
When updating a part from its initial release, append ` V#.#` (uppercase, case sensitive) to the Component Name, representing Major.Minor updates.
**Example:** `Ring V1.1`
### Hardware requirements
If your part requires hardware, nest all hardware as Components within a single top-level Component named `Hardware - ProjectName`.
**Example:** `Hardware - Body - Middle` where `Body - Middle` is the ProjectName.
### Reused hardware
When your part reuses hardware from a part it replaces, append ` [From:{Component}]` to the Component name.
**Example:** `M3 x 8 Cap Head Bolt [From:OSSM - Body - Middle]`
### Alternative hardware
When an alternative hardware option exists, append ` ({Specification} alternative)` to the Component Name.
**Example:** `M4x12 Cap Head Screw (M4 x 10 alternative)`
### Variant hardware
When hardware varies based on the user's setup, use `({Specification} for {variant},{Specification2} for {variant2})` in the Component Name.
**Example:** `(M6 x 15 Cap Head Screw for 3030 Extrusion,M6 x 20 Cap Head Screw for 4040 Extrusion)`
## Running a release from Fusion
This section is for OSSM Project Leads only. The release process is a proof of concept that may evolve over time, but it relies on the above conventions being followed strictly.
### Future work
* Convert `.stp` to `.stl` at high-quality refinement and bundle into `OSSM-Hardware/ossm/Hardware/OSSM Printed Parts` release
* Generate hardware documentation from `Hardware` named component structures
### Release steps
Rename your Fusion Document to `OSSM Release $MM.DD.YYYY`.
Export your Fusion Document as `OSSM.f3z` to overwrite the current file.
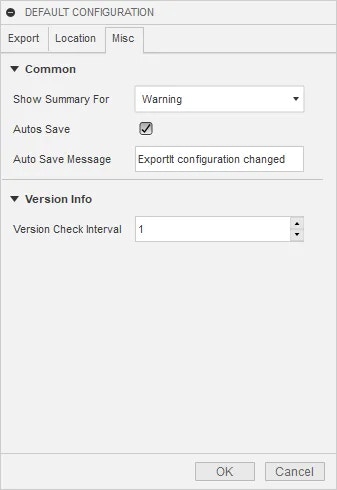
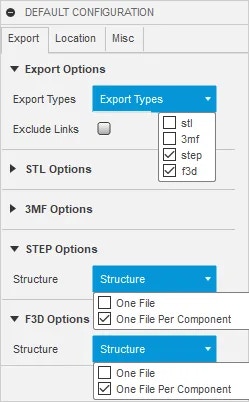
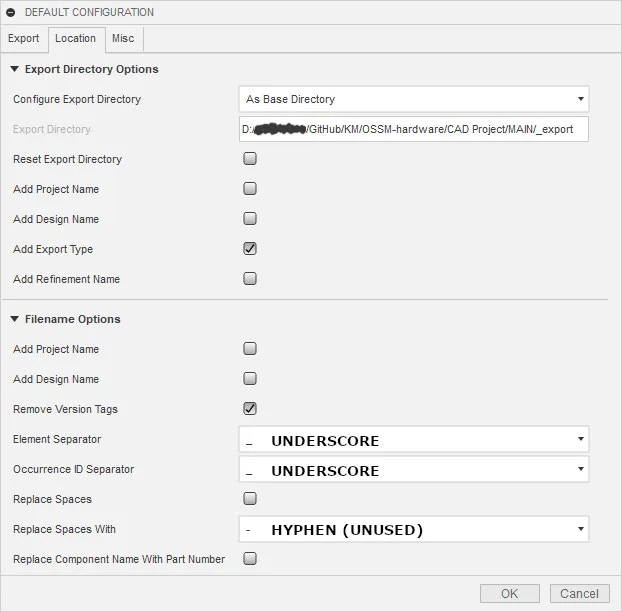
Run the Add-In "ExportIt" using the settings shown below. This populates the `_export` directory with `f3d` and `step` folders.
Run `OrganizeForRelease.ps1` in a PowerShell terminal from the directory containing the `_export` folder, next to `OSSM.f3z`.
This creates a `RELEASE` folder with the date appended, organizing files in release configuration:
* `.f3d` files are grouped based on Fusion nested structure
* `.stp` files are grouped based on naming convention, with children grouped into parent directories
* **Future:** Documentation framework generated referencing files in `Hardware` directories
Complete these final tasks:
* Move the previous release to the `_archive` folder
* Check for loose files in `_export` and remove them
Loose files in `_export` may indicate something went wrong during release generation.
### ExportIt settings
Configure ExportIt with these settings:
#### Export tab
## Project template
Use the contribution template located in the Templates directory (in the source repository) as your starting point. Replace "Project Name" in the Document and Component with your actual project name.
## Fusion file structure
Organize your Fusion 360 project following this hierarchy:
```
ProjectName
(Bodies)
(Component)ComponentNameOne
(Bodies)
...
(Component)ComponentNameTwo
(Bodies)
...
(Component)Hardware - ProjectName
(Bodies)
(Component)HardwareName:1
(Bodies)
...
(Component)HardwareName:2
(Bodies)
...
```
## Naming conventions
### Reserved characters
These characters have special behavior in documentation scripting. Follow these rules when naming Documents or Components.
| Character | Purpose | Usage rules |
| ------------------ | ---------------------------------------------- | ------------------------------------------- |
| `.` (dot) | Designates file extension | Allowed for versioning, e.g., `V1.1` |
| `-` (hyphen) | Designates parent-child Component relationship | Allowed in hardware names, e.g., `M5 T-Nut` |
| `_` (underscore) | Designates a Component | **Disallowed** |
| `[]` (brackets) | Designates reuse of hardware | Special use only |
| `()` (parentheses) | Designates special hardware instructions | Special use only |
### Single component projects
If your project contains only one printable Component, name that Component identically to the ProjectName.
### Parent-child component relationships
To designate a part as a child of a Parent Component, use the Parent Component's exact name followed by `-` and the Child Component name.
Example: `End Effector - 24mm Short` places the release file in the "End Effector" directory, named "24mm Short".
Only one Parent-child relationship is allowed per Document, and it must be on a single level. For more complex relationships, nest Documents as linked Components.
### Version increments
When updating a part from its initial release, append ` V#.#` (uppercase, case sensitive) to the Component Name, representing Major.Minor updates.
**Example:** `Ring V1.1`
### Hardware requirements
If your part requires hardware, nest all hardware as Components within a single top-level Component named `Hardware - ProjectName`.
**Example:** `Hardware - Body - Middle` where `Body - Middle` is the ProjectName.
### Reused hardware
When your part reuses hardware from a part it replaces, append ` [From:{Component}]` to the Component name.
**Example:** `M3 x 8 Cap Head Bolt [From:OSSM - Body - Middle]`
### Alternative hardware
When an alternative hardware option exists, append ` ({Specification} alternative)` to the Component Name.
**Example:** `M4x12 Cap Head Screw (M4 x 10 alternative)`
### Variant hardware
When hardware varies based on the user's setup, use `({Specification} for {variant},{Specification2} for {variant2})` in the Component Name.
**Example:** `(M6 x 15 Cap Head Screw for 3030 Extrusion,M6 x 20 Cap Head Screw for 4040 Extrusion)`
## Running a release from Fusion
This section is for OSSM Project Leads only. The release process is a proof of concept that may evolve over time, but it relies on the above conventions being followed strictly.
### Future work
* Convert `.stp` to `.stl` at high-quality refinement and bundle into `OSSM-Hardware/ossm/Hardware/OSSM Printed Parts` release
* Generate hardware documentation from `Hardware` named component structures
### Release steps
Rename your Fusion Document to `OSSM Release $MM.DD.YYYY`.
Export your Fusion Document as `OSSM.f3z` to overwrite the current file.
Run the Add-In "ExportIt" using the settings shown below. This populates the `_export` directory with `f3d` and `step` folders.
Run `OrganizeForRelease.ps1` in a PowerShell terminal from the directory containing the `_export` folder, next to `OSSM.f3z`.
This creates a `RELEASE` folder with the date appended, organizing files in release configuration:
* `.f3d` files are grouped based on Fusion nested structure
* `.stp` files are grouped based on naming convention, with children grouped into parent directories
* **Future:** Documentation framework generated referencing files in `Hardware` directories
Complete these final tasks:
* Move the previous release to the `_archive` folder
* Check for loose files in `_export` and remove them
Loose files in `_export` may indicate something went wrong during release generation.
### ExportIt settings
Configure ExportIt with these settings:
#### Export tab
 #### Location tab
 #### Misc tab